
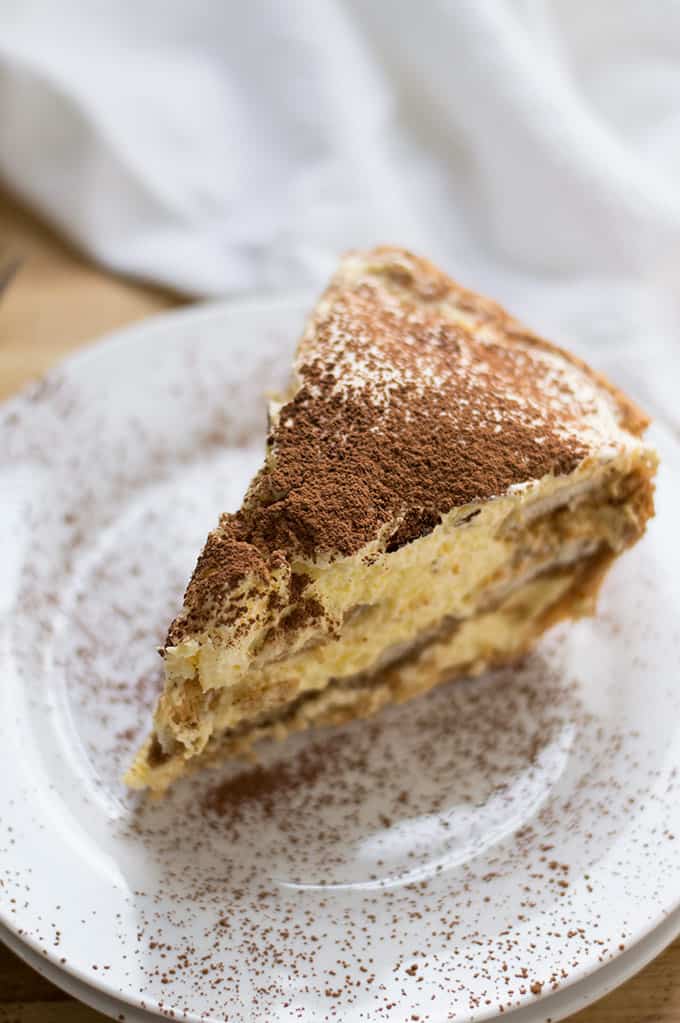
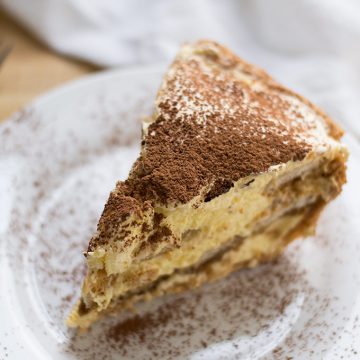
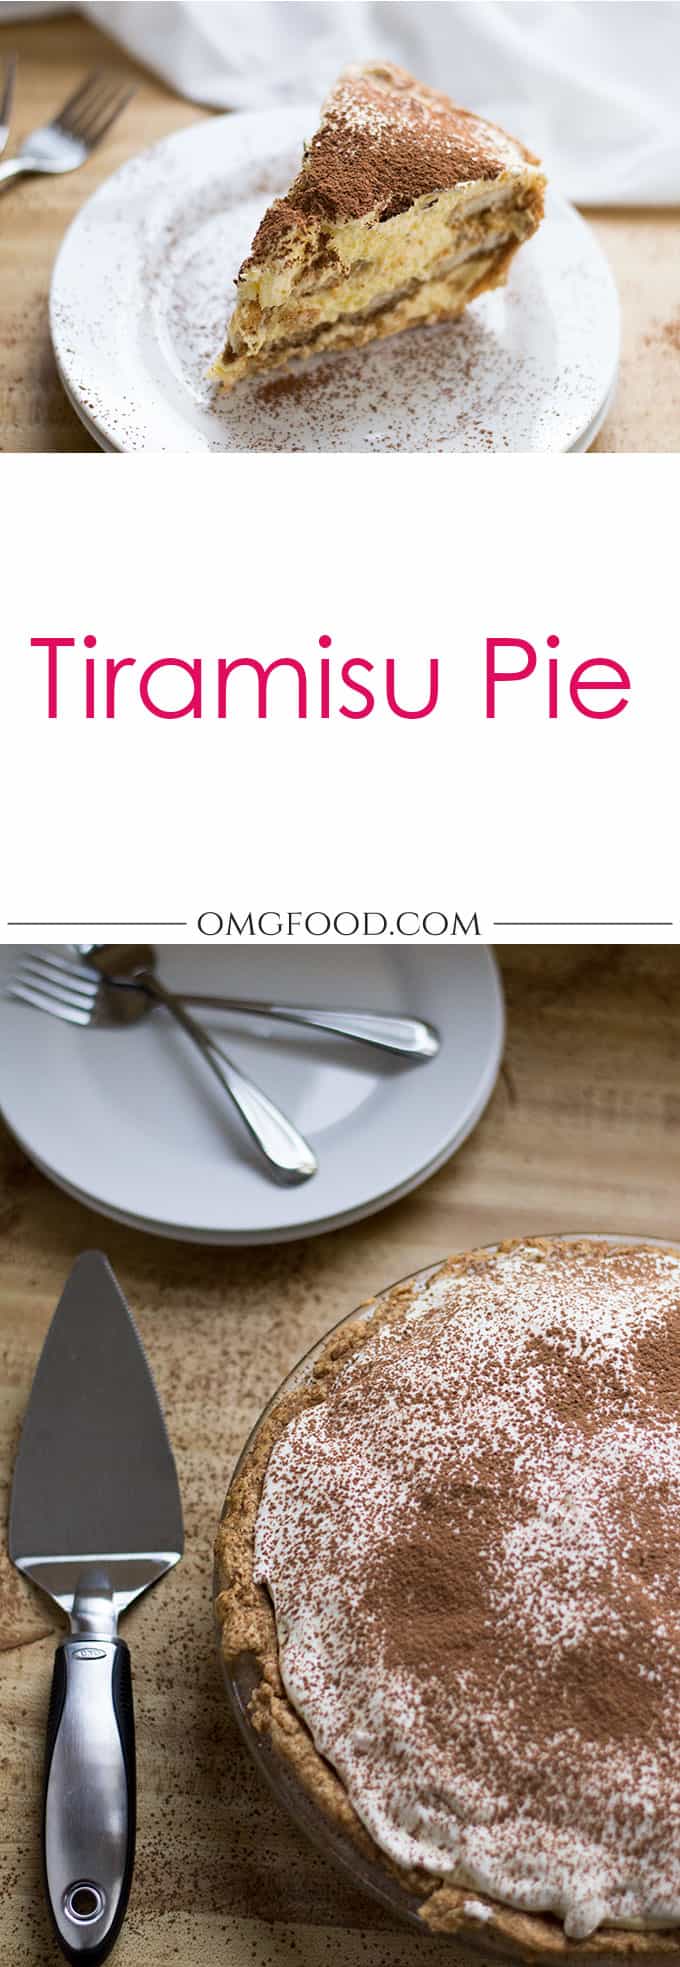
Tiramisu is a popular Italian custard dessert made with egg yolks, mascarpone cheese, strong coffee, and ladyfingers. Tiramisu pie takes that dessert to the next level! Made with a flaky, buttery crust, this dessert is perfect for a holiday gathering. Or just because.
OMGOMGOMGOMGOMG. You guys. It is time.
If you follow me on Instagram, you might have noticed when I shared this photo on Thanksgiving. It's tiramisu pie and I have been dying to share the recipe with you. Seriously, friends. Tiramisu pie? I mean, come on.
I have made this recipe in the test kitchen a handful of times now - and I made tweaks as necessary to make it taste just right. I gotta tell you, I am really happy with the final result. All taste-testers I threw this pie at (aka my awesome friends and family) will agree: this pie is pretty rad.
Tiramisu has always been up there on the list of desserts I love, but it wasn't until this past year I decided to make it myself. I was inspired by a recipe for tiramisu pie I saw in one of my books, Perfect Pies by Michele Stuart and decided to go rogue with it. It was kind of a bold decision to attempt a pie for the blog because I have always been intimidated by pie crusts. In the past, I've made some pie crusts I was never satisfied with. They would always fall apart or I would put too much flour or water and it was always a giant mess. Since then, my awesome friend Emily showed me how to make a simple buttery pie crust using a food processor and it was seriously a game-changer. She made it look so easy, I almost couldn't believe it could be that easy. Then again, she is a kitchen genius and I think one of these days, I need to partner up with her for a blog post. (Emily, you reading this? Let's do this!)
Aside from the ease of using the food processor, her tips on making an awesome pie crust is going with a 2:1 cup flour to fat ratio. The ratio has a nice ring to it and it's easy to remember. More flour will be added as needed, but 2:1 is a solid foundation to start with and I daresay it's a foolproof method.
Like most people, I do lots and lots of baking around the holidays and it can sometimes become a bit overwhelming depending on my schedule. If I have an option that will allow me to plan ahead, I am all for it. There are various steps to making this delicious tiramisu pie and it can take a few hours to prepare. To help with time (and maybe your sanity), you can prepare the pie crust ahead of time and freeze it!

I don't mean freezing a ball of dough and defrosting it before rolling it out and putting it on a plate before popping it into the oven. I mean, you roll out the dough, place it in your baking dish, wrap it tightly (and carefully!) with plastic wrap and/or tin foil, and put it in the freezer. When you're ready to bake, you place the frozen pie in the plate right into the oven!
To do this, you need good quality bakeware that won't break or bust due to the drastic temperature change. OXO has glass bakeware that's made of thermal shock-resistant borosilicate glass, which means it can go directly from your freezer to oven and you won't need to defrost anything beforehand. Their 9-inch glass pie plate is perfect for this recipe and I love that I can place a frozen pie crust in it right into the oven. The plate also has a generously sized rim, which makes it really easy to move from a hot oven to your countertop.
By the way, pie crust can be frozen for up to three months as long as it is tightly sealed. I opt for both plastic wrap and tin foil. Because extra protection is cool and stuff.
Tips On Blind-Baking A Pie Crust And Making Tiramisu Pie
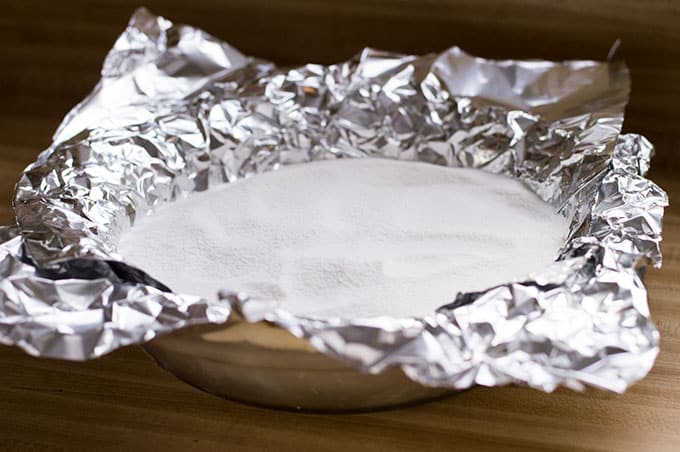
Blind-baking means to bake a pie crust or pastry without filling. You can't just place the pastry as is in the oven or else it will puff up! Typically, pie weights are used for blind-baking. In lieu of pie weights, many people will use dry rice or dry beans. Me? I use sugar.
I learned about using sugar as a pie weight replacement on Serious Eats and I loved the idea before I even tried it myself. You place tin foil onto the pie crust, make sure to cover the edges of the crust to prevent burning or excessive browning, and fill it two-thirds with sugar (approx. four cups). The sugar can be stored away in an airtight container after it's cooled down to room temperature and can be reused as a "pie weight" a small handful of times. After that, use it for baking! The toasted sugar will add some depth to your desserts and it will be awesome.
Mise en place is your best friend. Make sure you have all of your ingredients handy before you dive into preparing everything. You'll be happy you decided to stay organized. Trust.
You Will Make Two Whipped Creams
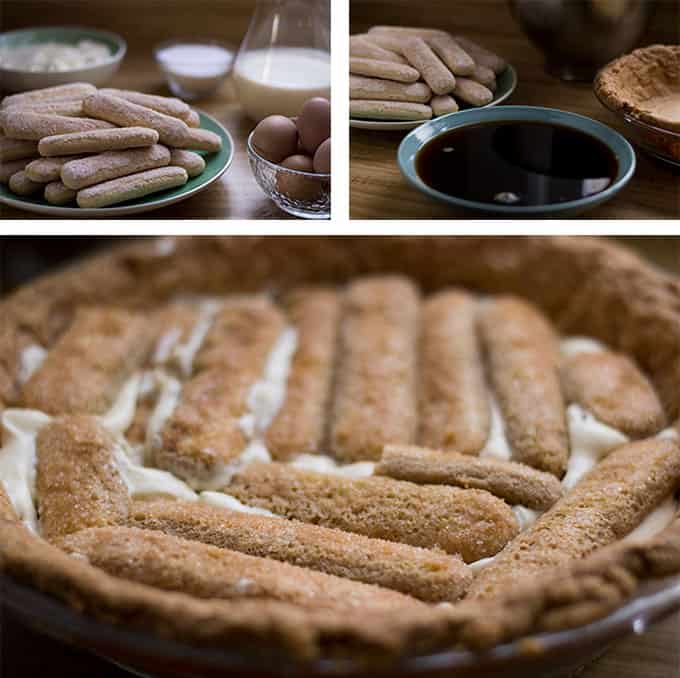
This recipe has four cups of heavy cream in it. Yes, I said four. No, do not count your calories when eating this. It's the holidays and it's time to treat-yo-self.
Half of the heavy cream will be made into a whipped cream to fold into the pie filling. The other half of the cream is meant for the whipped cream topping. To save time (and dishes), I recommend making these before starting on the rest of the pie filling. However, whip them separately. The whipped cream for the filling won't have added ingredients, whereas the topping will.
Also, I recommend freezing your mixing bowl and whip attachment at least 20-30 minutes before making your whipped cream. The colder the bowl, the better!
Don't Saturate The Ladyfingers
When making tiramisu, you dip ladyfingers into cooled down brewed coffee before layering it into the dessert. It's important you move quickly at this part. If you leave the ladyfingers in the coffee for too long, they will become saturated and break apart and that's bad news bears. Dip them into the coffee for just a second. That's all you need.
Don't Eat The Dessert Immediately After Preparing It
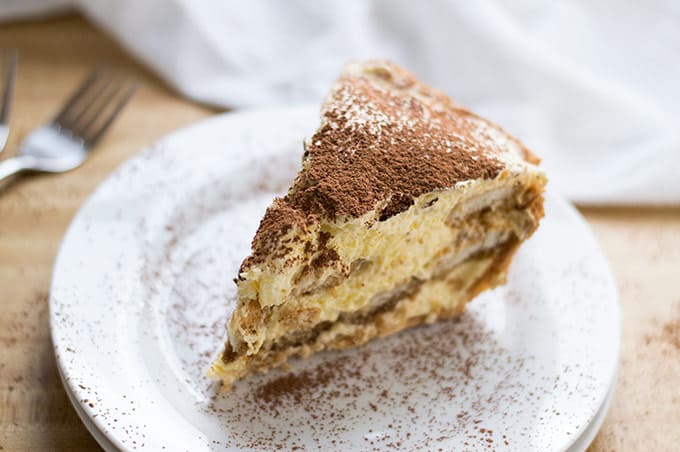
I know. This one might be tough. It's best to allow the tiramisu pie to chill in the refrigerator at least six hours before consuming. This will allow the pie to, you know, chill. And more importantly, this will allow all of the flavors to combine nicely.
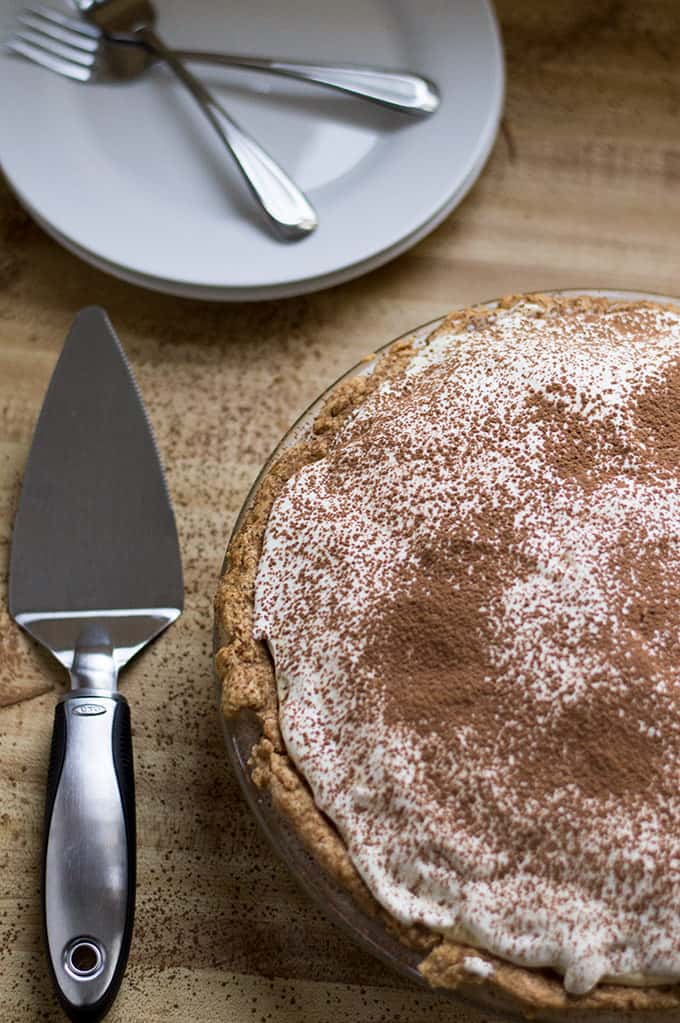
When you're ready to serve this epic pie, don't forget your SteeL Pie Server! Did you know I went years without owning a pie server? I'm never making that mistake again.
Happy Holidays, friends. <3
📖 Recipe
Ingredients
Pie Crust
- 2 cups all-purpose flour, plus more as needed
- 1 cup cold unsalted butter, sliced into ½-inch pieces
- 1 tablespoon sugar
- ½ teaspoon kosher salt
- 3-4 tablespoons ice cold water
Tiramisu Filling
- 6 large egg yolks
- ¾ cup sugar
- 1 pound mascarpone cheese
- 2 cups heavy whipping cream
- ½ teaspoon vanilla extract
- 2 cups brewed strong coffee, at room temperature
- ¼ cup dark rum
- 24 ladyfingers
Whipped Cream Topping
- 2 cups heavy whipping cream
- 2 tablespoons powdered sugar
- 1 teaspoon vanilla extract
- 1 teaspoon dark rum, (optional)
- ½ - 1 tablespoon cocoa powder for garnish
Instructions
Preparing The Freeze-Ahead Pie Crust
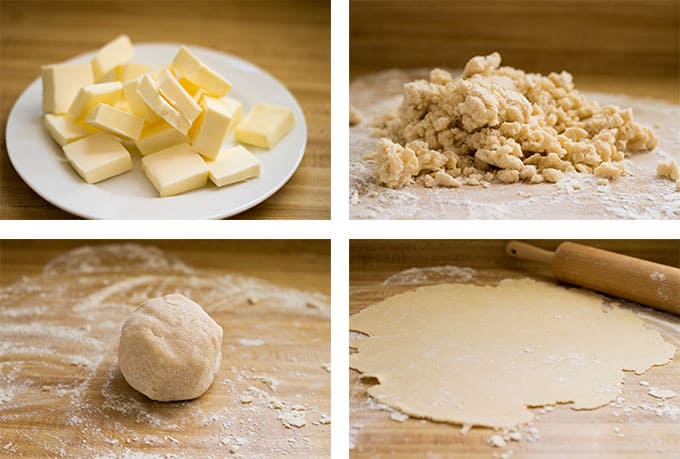
- In a large food processor, add in the flour, sugar, and salt. Pulse to combine the ingredients.
- Turn the food processor on and add in the butter one piece at a time with one second intervals. As soon as you add in the last piece of butter, turn off the food processor (or if you're moving quickly enough to immediately switch to the next step, leave it on).
- Add in the water one tablespoon at a time. Stop blending when the mixture resembles sand or small rocks.
- Dust ¼ cup of flour onto a clean, flat, and dry surface. Pour the pie dough mixture onto the floured surface and gather it into a ball. Then, split it in half and set one of the doughs aside.
- Using a rolling pin, roll out the dough into a 12-inch circle. As you roll the dough out, peel it up every couple of rolls and slightly rotate it, checking to see if more flour is needed (if the dough is sticking to the pin or counter, it needs a few sprinkles of flour).
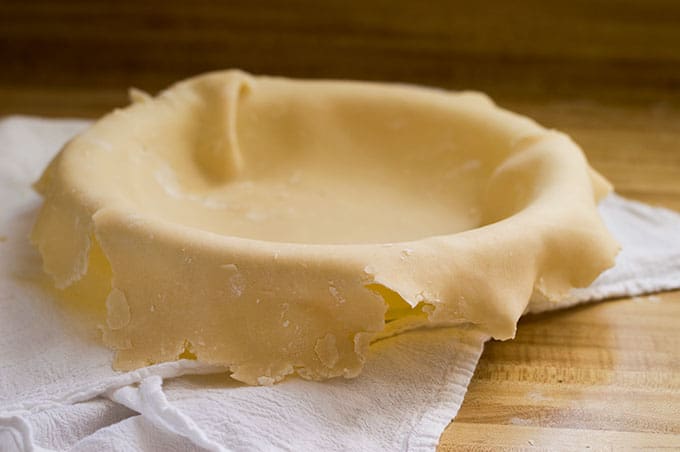
- Carefully place the pie crust onto a 9-inch glass pie plate, either by folding it or rolling it onto the pin. Gently press the dough into the plate.
- Using kitchen shears or a sharp paring knife, trim off the excess dough hanging off the side of the plate. Leave about ½ an inch off the side.
- Crimp the edges of the pie shell together. Don't worry about it looking perfect. It's pie!
- Wrap the pie carefully and tightly with plastic wrap and/or aluminum foil (I use both).
- Freeze it and forget about it until you need it! Typically, pie crusts can be frozen for up to three months.
Blind-Baking The Pie Crust
- Preheat the oven to 350 degrees.
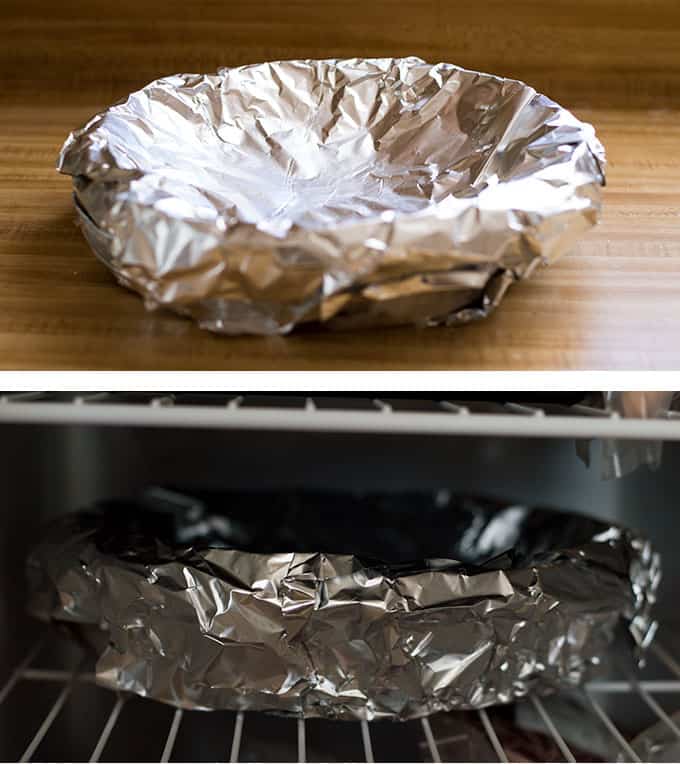
- Take the pie crust out of the freezer and remove the foil and/or plastic wrap.
- Line the crust with a fresh, wide sheet of aluminum foil (or use two sheets if what you have is narrow) and fold it over to protect the edge of the pie crust from burning.
- Fill the pie with at least two-thirds with pie weights. If you don't own pie weights, I recommend using sugar! You'll need about four cups.
- Bake the pie crust for 30-40 minutes, or until it is golden brown. Be careful not to burn it.
- Remove from the oven and let cool. Once the sugar is at room temperature, store it an airtight container. Discard the aluminum foil. (See note #1)
The Tiramisu Pie Filling
- While the pie crust is cooling, prepare the filling!
- Pour the brewed coffee into a wide bowl or baking dish. Pour in the rum and set aside (if the coffee is still hot, let it cool before adding in the rum).
- Using a stand mixer and whip attachment, beat the two cups of cream on medium-high speed until stiff, about three to five minutes. Transfer the whipped cream to another bowl, making sure to scrape the sides of the bowl and the whip attachment. Set it aside. (See note #2.)
- Place the bowl and whip attachment back on the mixer. Add in the egg yolks and sugar. Beat on high for five to seven minutes, until the mixture is smooth and frothy.
- Add in the mascarpone a dollop at a time, followed by the vanilla extract.
- Continue to mix for another 30 seconds, until all of the ingredients are blended together smoothly. Gently fold in the whipped cream using a silicone spatula. Set aside.
The Whipped Cream Topping
- Using a stand mixer and whip attachment, beat the cream on medium-high until stiff peaks form, about three to five minutes.
- About halfway through, when the cream starts to thicken, gradually add in the sugar, vanilla, and rum. Set aside.
Pie Assembly
- Gather the mascarpone mixture, ladyfingers, brewed coffee/rum mixture, and whipped topping.
- Layer the bottom of the pie shell with a third of the mascarpone mixture.
- Quickly dip the ladyfingers into the coffee and arrange them over the cream mixture. Use 12 ladyfingers for the first layer.
- Spread with another one-third of the mascarpone mixture and repeat the steps for the ladyfingers for the second layer.
- Top with the remaining mascarpone mixture and spread it evenly.
- Spoon or pipe the whipped cream on top. Store any leftover whipped cream in an airtight container in the refrigerator for up to three days.
- Using a handheld mesh sieve, garnish the pie with a light dusting of cocoa powder.
- Chill in the refrigerator at least six hours before serving and consume within three to four days.
- Enjoy!
Notes
Recipe inspired by Michele Stuart's "Tiramisu Pie" from Perfect Pies
Disclaimer: OXO provided me with free products to use in this blog post. All opinions are my own!

If I want to make the pie crust there and then, do I change the cooking time/temp at all?
Hi Heather,
I would start the timer at 15 minutes and check every few minutes from then. I hope that helps!
I made this and it's a really good pie. The only problem is that the filling and whipped topping recipes are enough to make two pies. I used a 9" deep dish pan and still only needed half the filling. Even with half, it was over the top of the crust. So I just made a second pie and brought it to the office the next day. I'll cut that in half next time.
Darren, thanks for the feedback! I haven't had this problem, but perhaps that means I need to make this again sooner than planned to see how many pies I come up with. I'm glad it was a tasty problem at least. 🙂 Cheers!
Can you use ready made pie crust?
Absolutely!
I’m concerned about the egg yolks not being cooked. Should I be?
Hi Denise! You can use pasteurized eggs if you'd like – that ensures more safety to consume raw.